Rubi Mining KYC Full Process
If you use the Rubi Mining app, then you already know one thing. You cannot withdraw, claim rewards, or unlock full features without completing your KYC. Many users wait for weeks because they do not know how the KYC works, when the KYC invite comes, or what documents they need.
So in this guide, I will walk you through the full Rubi Mining KYC process from start to finish.
You will learn:
- When your KYC gets unlocked
- How the KYC invitation works
- What you must complete before KYC
- How many RBL tokens you need
- How to pay the KYC fee
- What documents to upload
- How to take the selfie correctly
- How long it takes for KYC approval
This guide is very easy to read. No complex words. Just simple steps. Let’s begin.
What Is Rubi Mining KYC?
KYC means Know Your Customer. Rubi Mining uses this process to stop fake accounts, bots, and spam miners.
If you complete your KYC, you prove your identity and confirm you are a real user.
This also protects your future rewards, token payouts, and wallet functions.
Completing KYC early is smart. It keeps your account safe and ready for future token releases.
Who Can Do Rubi Mining KYC?
This is where many users get confused. You cannot do Rubi KYC anytime you want. The KYC option appears only when Rubi sends you an official KYC invitation.
You will not receive the invitation until you complete three conditions:
1. Minimum 30 Days of Mining
You must mine Rubi tokens for at least 30 days inside the app.
2. Minimum 30 Rubi Tokens Mined
You need to earn at least 30 Rubi from your daily mining.
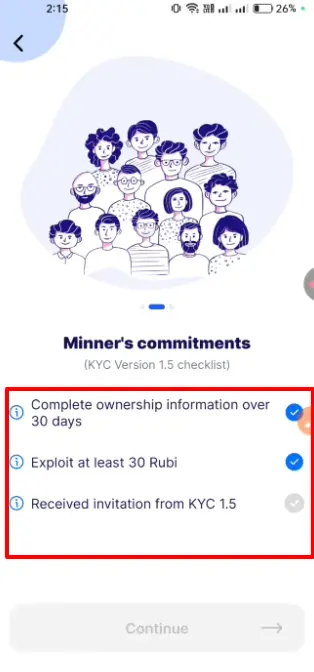
3. KYC Invitation From Rubi
After the first two conditions are complete, Rubi decides when to unlock KYC for your account.
It is automatic.
You cannot force it.
You cannot request it manually.
The app sends a message like:
“You are now eligible for KYC verification.”
Only then can you continue.
How to Check If Your KYC Is Available
Follow these steps:
- Open the Rubi Mining App
- Go to the Profile section
- Tap Account User Verification
You will see one of these:
A) “Not Verified” + No buttons
Your KYC is not open yet. You must wait.
B) Three green checkmarks + Continue button
Your KYC is ready. You can start the process.
If Your KYC Has Not Arrived Yet
Do not worry. This is normal.
Many users get their invitation late.
Just continue mining daily.
Once your account reaches the requirements, Rubi will unlock your KYC automatically.
Full Rubi Mining KYC Process (Step-by-Step Guide)
Now let’s walk through the full process from start to finish.
Step 1: Open the Verification Page
When your KYC invitation appears:
- Go to Profile
- Select Account User Verification
- Tap Continue
You will see a page with instructions and rules.
Scroll down and tick the agreement checkbox.
Then tap Continue.
Step 2: Select Number of KYC Attempts
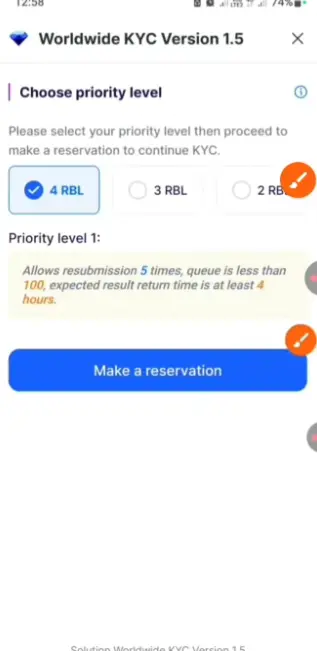
Rubi Mining requires you to pay with RBL tokens to submit your KYC.
They give you options:
| RBL Tokens | Number of Attempts |
|---|---|
| 2 RBL | 1 Attempt |
| 3 RBL | 2 Attempts |
| 4 RBL | 4–5 Attempts |
If your first attempt fails, you will need another attempt.
This is why 4 RBL is the best option.
It gives you the most retry chances.
When you select the amount, tap:
“Make KYC Reservation”
The app will show you a wallet address and a 10-minute timer.
You must send the RBL tokens before the timer ends.
Step 3: Send RBL Tokens to Rubi Address
You now have two ways to get the address:
- Copy the address
- Screenshot the QR and upload it
Then follow these steps:
- Go to your RBL wallet
- Select Send
- Paste the address (or upload screenshot)
- Enter the amount (2, 3, or 4 RBL)
- Tap Transfer
Once the RBL is sent, you will see three green checkmarks on the screen.
This means your payment was successful.
What If You Do Not Have RBL Tokens?
Many new miners do not have RBL in their wallet.
No problem.
Most users buy RBL through:
- Telegram trading channels
- P2P community groups
- Local crypto sellers
Make sure you trust the seller.
Always check admin IDs and support links.
Once you have RBL in your wallet, you can continue the KYC process.
Step 4: Choose Your Document Type
Rubi Mining supports:
- National ID Card
- Passport
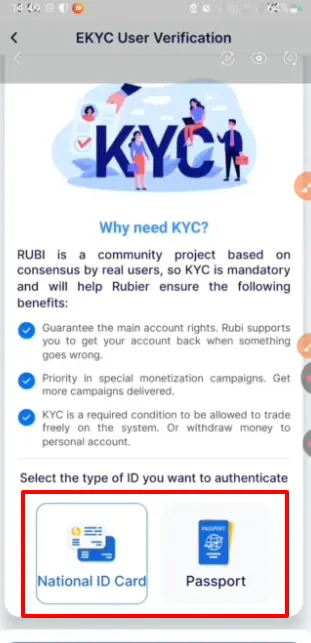
For most users, the easiest option is National ID Card.
Select your document type and tap Continue.
Step 5: Upload Front Side of Your ID
Take a clear photo of the front side of your National ID.
Tips for best result:
- Hold your ID straight
- Use bright daylight
- No shadow on the card
- Make sure text is readable
Upload the photo and tap I Got It.
Step 6: Enter Personal Information
You will now fill in details from your ID:
- Full Name
- Country
- Date of Birth
- Document Number
- Gender
- Nationality
- Place of Origin
Make sure everything matches your ID exactly.
If not, your KYC can fail.
After entering everything, tap Continue.
Step 7: Add Extra Document Details
More fields will appear:
- Place of Residence
- Date of Issue
- Expiry Date (if available)
- Place of Issue
- District / Police Station / Thana
Again, enter the details exactly as written on your documents.
Tap Continue.
Step 8: Upload Back Side of Your ID
Now the app will ask for the back part of your National ID.
Take a clean photo.
Avoid glare, reflection, or blur.
Upload the image and continue.
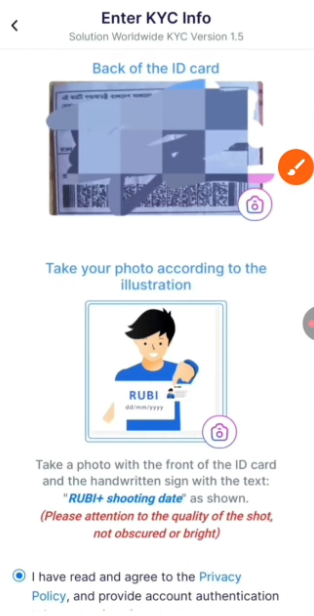
Step 9: Take Your Rubi KYC Selfie
This step is the most important.
If you do it wrong, your KYC may fail.
You must follow these rules exactly:
1. Take a blank white paper
Write:
“Rubi”
Below it, write the date in this format:
DD / MM / YYYY
Example:
18 / 11 / 2025
2. Hold the paper in one hand
The paper must show:
- Rubi
- Current Date
3. Hold your National ID in the other hand
Your ID must be fully visible.
4. Your full face must be visible
Not covered.
Not cropped.
No mask.
No sunglasses.
5. Take a clear photo
Good lighting.
Neutral background.
Face the camera.
Upload the selfie and tap Continue.
Step 10: Submit Your KYC
Once all steps are done, tap:
“Send KYC”
Your KYC will now go under review.
You will see:
“Your KYC request has been received and is under process.”
You are done.
How Long Does Rubi Mining KYC Take?
Normally:
- 4 to 5 hours for most users
- Sometimes 24 hours
- Rarely up to 3 days
You will get a notification when:
- Your KYC is approved
or - Your KYC is rejected
If rejected, you can retry — if you selected the 4 RBL option.
Why Rubi May Reject Your KYC
Here are common mistakes:
- Blurry ID photo
- Wrong document number
- Wrong date of birth
- Selfie not clear
- Selfie without “Rubi” written
- No date on paper
- ID not matching face
- Shadows blocking text
- Using expired document
Always double-check everything before submitting.
How to Increase Your KYC Approval Chance
Follow these simple tips:
- Use bright daylight
- Clean your camera lens
- Hold your ID steady
- Make your handwriting clear
- Check your personal details
- Use a plain background
- Avoid low-quality front cameras
- Do not crop the images
If your photo is clear, your KYC will almost always pass.
Is Rubi Mining KYC Safe?
Yes.
Rubi requires KYC to keep the platform safe from:
- Fake miners
- Duplicate accounts
- Bots
- Scammers
Your data is encrypted and used only for verification.
Still, always keep your account secure:
- Use strong password
- Never share your ID with random users
- Avoid fake apps and scam links
- Only use the official Rubi Mining app
Can You Do KYC Without RBL Tokens?
No.
You must use RBL tokens to pay the KYC verification fee.
The fee is small.
The tokens are used to stop mass fake signups.
If you do not have RBL, you must buy them first.
What Happens After You Pass KYC?
Once approved:
- Your account becomes Verified
- You unlock future Airdrop claiming
- Your rewards become secure
- You get higher mining trust
- Your withdrawals become possible (when enabled)
KYC is required for all future token features.
Frequently Asked Questions
1. Can I use someone else’s ID?
No. Your KYC will fail. The face must match the ID.
2. How many attempts do I get?
Depends on how many RBL tokens you use.
3. Can I cancel KYC after payment?
No. Token payment is final.
4. What if I lose internet during KYC?
You can continue later as long as you have remaining attempts.
5. Can minors do Rubi KYC?
No. You must be 18+ with valid documents.


Post Comment